Chapter 19 – How To Prepare Your Home For Safety: 34 Recommendations And Checklists
Chapter 19 – How To Prepare Your Home For Safety: 34 Recommendations And Checklists

- Two To Eight Weeks Prior To Surgery
- Safety Measures To Prepare For Your Stairs
- Handrails
- Hip Tip – Grab Tight
- Hip Tip – Dueling Handrails
- Grab Bars
- Shower Safety
- Sealer Wax, Satin (Non-Slip)
- Hip Tip – Bathing Conveniences
- Raised Toilet Seat
- Hip Tip – Toilet Paper Logistics
- To Bidet Or Not To Bidet (Optional)
- Non-Electric Mechanical Bidet Toilet Seat Attachment
- Hip Tip – Car Access:
- Safety Measures To Prepare Your Deck And Patio
- Deck Out Your Deck
- Outdoor Furniture Considerations
- No Tripping
- Low, Low, Low
- Establish A “Creation Station”
- Hip Tip
- Multi-Level Homes
- Hip Tip – Size 14 Feet, Size 10 Stairs
- Hip Tip – Crutches For Support
- Chairs and Couches
- Hip Tip – Create A Safety Chair By Raising Chair Height:
- Hip Tip – No Arms? No Problem
- Hip Tip – Dining Table Stability
- Hip Tip – Raising Couch Height
- Go Wireless
- Hip Tip – Floor Safety
- Ease of Access
- Safety Measures To Prepare Your Bedroom
- The Princess And The Pea Mattress
- Hip Tip – Just Sleep On The Couch
- Night Stands
- Hip Tip – Got A Crutch?
- Hip Tip – Mail Alert System
- Safety Measures To Prepare For Your Kitchen
- Hip Tip – Kitchen Cooking
- Hip Tip – Locating Commonly Used Food Items
- Hip Tip – Kitchen Fashion
- Hip Tip – Getting Out Of Cooking Or Dishwashing

Two To Eight Weeks Prior To Surgery
Here is a hip surgery checklist of how to prepare your home before you get hip replacement surgery:
Safety Measures To Prepare For Your Stairs
Handrails – Make sure that both internal and external handrails are secure and strong enough to support your weight. Also, make sure the rails go all the way to the top and the bottom of the stairs.
Hip Tip – Grab Tight: You will be amazed at how much more tightly you grip handrails during recovery. I am big, and my wife says sometimes a bit clumsy, so I took out all the short handrail screws and used bigger and longer screws to more securely attach the handrail to the wall.
Hip Tip – Dueling Handrails: If you are heavy or consider yourself weak, have handrails installed on both sides of any stairway. Sometimes, adding handrails along a hallway can prove beneficial and provide you with additional safety.
The Bathroom Safety Measures You Absolutely Must Implement
Grab Bars – Be sure to securely install grab bars next to the toilet as your hip muscles will be very sore after surgery and you will need the grab bar to stand up. Also, install grab bars in the shower and tub. You will be surprised at how slippery the shower floor feels when you can’t move fast. You may have minor balance issues after surgery as well.

There are many different, top-rated bars to choose from. Consider the following options:
Shower Safety – Don’t place any shampoo or conditioner on the shower floor as you will have to bend down to get them. If you have a slippery tub or shower floor, consider a nonslip rubber mat. Note that even that mat can trip you up, so be careful. Just be sure the edges of your mat aren’t larger than your tub. You don’t want to trip on a raised edge. Consider something like this: Extra Long Rubber Safety Bath Mat (18 x 36 Inch).
9.2
Rod’s Comments: I still use these every day – safety first!
- 2-Pack: Contains two grab bars
- Multiple Lengths: 12 – 32 inch lengths available
- Weight Limit: 500 lbs.
- Brand: Tesuchan
- Material: Stainless Steel
- Item Dimensions: LxWxH 17.68 x 3.46 x 2.83 inches
- Finish Type: Polished
9
Rod’s Comments: Better safe than sorry!
- Size: 40 x 16 inches
- Color: Multiple colors available
- Safety: Non-slip material
- Easy-Clean: Machine washable
9
Rod’s Comments: Better safe than sorry!
- Adjustable Handle: 35.2 – 39.2 inches
- Weight: 9.5 lbs.
- Weight Limit: 350 lbs.
- Safe: Non-slip texture to prevent falls
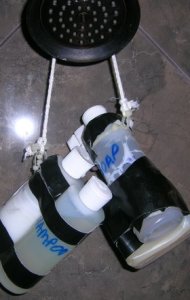
Hip Tip – Bathing Conveniences: I attached the shampoo and liquid soap bottles via a rope and then looped the rope around the shower head. Nothing ever hit the floor in the shower, not even me.

Raised Toilet Seat – You will be advised countless times about exercising safe hip precautions, specifically always having at least a 90 degree angle (this number will vary by orthopod) between your torso and thigh.

One of the biggest abusers of this rule are toilet seats. In general, the cheaper the toilet, the lower they are to the floor. One way to fix this is to buy a raised toilet seat. This temporary device will help you maintain an acceptable sitting angle and makes it easier to stand up.
“You never realize you need toilet paper until it’s too late.”
Unknown, but experienced, author
Hip Tip – Toilet Paper Logistics: Sometimes, the toilet paper holder is located where you may have to turn your body to reach it. Even that little bit of torque on your body and hips can be very uncomfortable.
For the first four weeks after my surgery, I conveniently kept a loose roll of toilet paper on the window sill where I could more easily reach it. Also, keep the original toilet paper holder full as you will be unable to reach down under the sink and replace it. Undoubtedly, your roll of toilet paper will want to sprout legs so you can watch it roll away from you along the floor.
To Bidet Or Not To Bidet (Optional) – Now, that is a question… After hip replacement surgery, you will find it difficult to make those simple body twists associated with extended visits to the bathroom. Either a full bidet (I think bidet is French for, “I am either too lazy or unable to reach my buttocks area”), or a simple bidet attachment, will allow you to enjoy the simple pleasures of automated hydrodynamic hygiene. Toilet paper is the fallback option.
Here is a low cost, top-rated bidet attachment: Non-Electric Mechanical Bidet Toilet Seat Attachment
This full-blown bidet attachment has other options as well: Ultimate Advanced Bidet Toilet Seat
Safety Measures To Prepare Your Garage
Consider adding a handrail if there are stairs to your garage.
Hip Tip – Car Access: Most garages are not wide enough to fully open the car door so you and your repaired hip can easily get in. Have your car pulled out first and parked on flat ground that offers you firm footing.
Safety Measures To Prepare Your Deck And Patio
Deck Out Your Deck – The first danger you will notice about your deck or patio is that little lip that guides your patio door slider. It may be only an inch high, but it definitely is noticeable after surgery. If your deck is wet, has a slippery finish, has loose flooring, or leaves have fallen, exercise caution in all your movements.
Outdoor Furniture Considerations – The other precaution to take is the be sure that patio furniture provides the proper seat height so you can exercise safe hip precautions when standing. Try and use chairs that have arm rests to support your effort in standing.
General Household Safety Measures
No Tripping – Our homes are full of many tables, loose rugs, boxes, extension cords and other creatures wanting to reach up and trip you. Each of these items are a potential hazard to your safe recovery. Remove all throw rugs, including any doormats inside or outside your home. Even a cat or dog bed can be dangerous. Every one of those loose items wants to reach up and trip you.
Low, Low, Low – After surgery, you will not feel like doing anything so take the time before your surgery and prepare your home to accommodate your post-surgery needs. After surgery, your feet will be barely off the ground and your walker, and later crutches, also will pass close to the floor. You need to remove all items that can pose a safety risk.
Establish A “Creation Station”: For the first few weeks, you will be highly “energy efficient,” meaning that you are not going to get up and move about unless you have to. (It’s what my mother-in-law calls my normal state of being.) You will want to think about all the typical daily movements you do while at home and attempt to either eliminate or consolidate those activities.

Hip Tip – Imagine The Biosphere 2 Project: Much like greenhouse-like enclosure that was designed to be totally self-contained, your creation station should be the same way. Establish your creation station by bringing all your necessities to one location, often near the couch. You will have meds, TV remote, landline, cell phone with charger plugged in, tablet or laptop with electrical connection, a place for your crutches or walker, blanket, extra pillows, magazines and books, space for your favorite beverage and, if you are really into efficiency, a small cooler. My first attempt at a creation station was to snap my fingers and signal towards my mother-in-law to fetch me a beer, but that didn’t go over too well with her or my wife.
Multi-Level Homes – If you have a multiple story home where your kitchen, bathroom and living room are on the main floor and the bedroom is upstairs, you might set up a temporary bedroom on the main floor so you don’t have to navigate stairs.
Hip Tip – Size 14 Feet, Size 10 Stairs: Dainty feet have always been a problem for me. After surgery, the major challenge was going down a stairway. Each landing step is typically about a size 10 shoe. My feet are a bit larger and thus they hang over the stairs. This is OK when going up as your toes can ‘grip’ the stairs, but going down, your heel doesn’t provide much traction or stability. What to do? Be careful is all I can suggest.
Hip Tip – Crutches For Support: I always kept my crutches near me, even when I was mostly done using them just for the support they provided in standing from a low chair, bed, toilet, or couch.
Chairs and Couches – Most chairs and couches are too low to the ground to provide a safe hip precaution. Since they are so low, they make it difficult to get up.
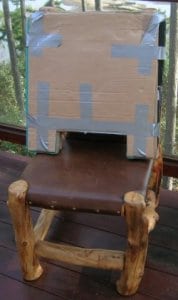
Hip Tip – Create A Safety Chair By Raising Chair Height: You should already have raised the couch and chair seat height by cushions. Below are images of how I raised our dining room table chair. I took six-inch sheets of cardboard and cut them into the shape of the dining room chair seat. Then, I used simple duct tape to secure all the cardboard together to create a raised dining room chair (first image).

Next, I added a gel pillow on top of that to get the desired height and a degree of softness for my operated hip. If only I could have used duct tape to fix my hip…
Hip Tip – No Arms? No Problem: Note that these chairs do not have side arms to help me stand. Initially, I placed my walker next to this chair, but it was too hard to turn. Ultimately, I would use our sturdy dining table for one of my hands and the back post of the chair for my other hand in order to stand. (And yes, my wife was annoyed that I used cardboard and duct tape).
Hip Tip – Dining Table Stability: Be sure to assess the stability of your dining table (or anything else you use to help stand up) as some tables are not fully secured or balanced. You could push down on the table and it could tip from your weight.
Hip Tip – Raising Couch Height: For the couch, I took extra pillows and placed those pillows between the seat cushions and the frame to raise the couch seat by about 18”. A good source of pillows can be from your patio furniture.
Go Wireless – Make sure you have no phone extension wires, computer cables, or extension cords that can catch your feet and cause you to fall.
Hip Tip – Floor Safety: Do you have super slick tile or wood floors? If your floor is especially slippery, consider putting some sealant wax on it to reduce the chance of slipping and falling: Sealer Wax, Satin (Non-Slip)
Ease of Access – If you have boxes, plants, tables or similar items on the floor that constrict your passage, it is wise to move them to give you as much safe width when walking, or trying to, about your home.
Safety Measures To Prepare Your Bedroom
The Princess And The Pea Mattress – The two mattresses we had on our bed frame were very high off the ground, and that made it difficult to ‘climb up’ to get into bed. It’s not quite the Princess and the Pea fairy tale, but the mattress was so high, it was hard to lift my repaired hip up to mattress level. I wasn’t prepared for this, so the neighbors came over and removed the bottom mattress. This allowed me to get in and out of bed more easily, but I was still uncomfortable.
Hip Tip – Just Sleep On The Couch: I ended up sleeping on the couch (that was the first time that happened without me being in the dog house) for the following few weeks because I found it easier to get up from the couch. Also, I am a stomach sleeper and when you return from surgery, you can only sleep on your back which made it difficult for me to get comfortable. After a couple of weeks, I could gradually get on to my side (with a pillow between my knees) and have the back of the couch support my side sleeping. It took me about eight weeks before I could sleep on my stomach somewhat comfortably, although after the first few times, my hip was really sore the next day.
Night Stands – When you get out of bed, you may instantly seek something to grab and assist in standing up. Most night stands are not strong, nor stable, nor balanced enough to support your weight.
Hip Tip – Got A Crutch? I always kept a pair of crutches next to the head of the bed to allow me to have strong support when getting up in the morning.
Hip Tip – Mail Alert System: If your mailbox is far away, you might buy either a visible or an audible mail alert system like this one: Mail Chime – Wireless Mail Alert System. This is the audible mail alert system I bought. The visible system typically is an extra flag or marker installed on your mailbox so when the mailperson opens the mailbox, the marker is extended so you can see it from your window.
An audible mail alert system operates on the same principle, except when the mailbox opens, a radio wave is sent to a receiver in your home and sounds each time the mailbox is opened. My audible system was about $45 and I was about 150 feet from the mailbox. The good news is the alert system is good year-round, even in blinding rainstorms.
Safety Measures To Prepare Your Kitchen
Remove any rug or floor mat in the kitchen. You don’t want to catch an edge and fall.
Hip Tip – Kitchen Cooking: Move any cooking appliances, pots, coffeemakers, or pans which you frequently use to an easy level to reach.
Hip Tip – Locating Commonly Used Food Items: If you have pets, place the cat or dog food cans on a shelf you can easily reach. In our home, the cat food is on the bottom shelf so my wife would leave four or five cans on the counter so I could feed those demanding critters without having to bend down. I ended up hovering the paper plate about 24” over the floor, then dropping it as I couldn’t bend.
Hip Tip – Kitchen Fashion: Keep an apron nearby that offers pockets that will carry things for you.
Hip Tip – Getting Out Of Cooking Or Dishwashing: If you are trying to shirk either cooking or dishwashing responsibilities, be sure to frequently complain about how dangerous the floor is and how uncomfortable it is to stand for longer than a minute or two. Somehow, for me, it was the last area of any household chore activity to demonstrate my full recovery.
Alrighty… that concludes Chapter 19.


