Chapter 29 – What To Expect During The Days After Surgery – While At Home
Chapter 29 – What To Expect During The Days After Surgery – While At Home


- Those Three Magic Numbers
- Eight Symptoms That Can Cause You To Go Back To The Hospital (Is There A Doctor In The House?)
- Two Primary Goals
- Three Most Important Goals: Safety, Safety And Safety
- Which Normal Activities Can I Resume?
- So… What Can Activities Can I Do?
- The Ikea Medical Stress Test
- Hip Tip – Incentivized Care Giving
- Getting Out Of Bed – The Leg Hook
- Stairway To Heaven
- Stair Mastery – Up With Good, Down With The Bad
- How To Use Crutches Going Up A Set Of Stairs
- How To Use Crutches Going Down A Set Of Stairs
- I Was Sleeping On The Couch And Wasn’t Even Mean To My Wife
- After Sleeping On Your Back, You Will Want To Sleep On Your Side
- Hip Tip – Stomach Sleepers
- Bandage Management
- Tunes To Relieve Pain
- Have Character – Do It Now
- Post-Surgery Exercises
- Walk This Way, With Your Walker
- Four Steps To Walking With Your Walker
- These Walkers Are Made For Everything
- Tearing Up The Walker
- Runners And Walkers
- “Walkers! Walkers! They are everywhere! Run!”
- Hip Tip – It Is Hip To Be (A Small) Square
- Hip Tip – Increase Your Distance Every Day
- Pre-tied Shoelaces
- Take A Stand

What To Expect During The Days After Surgery – While At Home
Those Three Magic Numbers – Remember, you just had major surgery and you can experience unintended consequences. If you have any major concerns or conditions, call 911 immediately. Most other medical inquiries can be resolved with a call to your doctor’s office.

Eight Symptoms That Can Cause You To Go Back To The Hospital (Is There A Doctor In The House?) – Well, yes there is — it’s you! You have an active role in monitoring your recovery. Call your physician immediately if you note any of the following symptoms:
- Increase in redness, bleeding, pain, or swelling on or around the incision.
- If you have a fever over 101 degrees.
- If there is a change in color or amount of drainage around your incision.
- If the edges of your incision are separating.
- If you experience a sudden shortness of breath.
- If you experience any symptoms of a blood clot, including swelling in your thigh, calf or ankle that does not diminish after elevating your leg or pain, heat, and tenderness in back of calf, back of knee, or groin area.
- Any other situation that cause you alarm over your recovery.
Again, dial 911 if your medical situation warrants the call.
Two Primary Goals – My main recovery goals were reasonably simple: to heal as fast as I possibly could and to not get any worse by doing something risky.

9.4
- Brand: Drive Medical
- Color: Silver
- Material: Aluminum
- Item Weight: 7.5 lbs.
- Weight Limit: 350 lbs.
- Item Dimensions: LxWxH 17.5 x 24 x 32 inches

9.4
Rod’s Comments: I still use these to this very day.
- Interchangeable Tips: Swap out the tips quickly and easily
- Colors: Multiple colors available
- Adjustable Length: From 24.5 – 54 inches
- Comfortable: Anti-slip cork handles
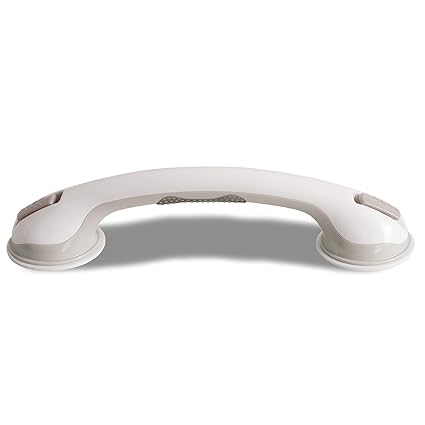
8.6
- Brand: Safe-er-Grip
- Material: Plastic
- Color: White/Grey
- Item Weight: 0.9 lbs.
- Weight Limit: 200 lbs.
- Item Dimensions: LxWxH 16.5 x 4 x 3.75 inches
Three Most Important Goals: Safety, Safety, And Safety – Three important goals upon arrival home are safety, safety, and safety. Ever see a military movie where the soldiers are carefree while strolling through a field and all of a sudden one yells, “Land mines!” and everyone freezes? Now the soldiers move slowly, cautiously and with fear. That is exactly what happens when you get home — everything on the floor is a land mine. Make sure you have safety-proofed your home by removing all loose carpets, cables, and wires that can cause you to trip.

Which Normal Activities Can I Resume? The 1967 song by The Human Beinz Nobody But Me sums up what activities you can resume after your hip replacement surgery. In case you don’t know the song, it starts out with the word “no” repeated 30 times.
Specific activities you should avoid include running, downhill skiing, singles tennis, and squash. In short, you should avoid every and any activity that may put your new hip at risk for dislocation or excessive pounding. Repeat after me: “No.”
The first 30 words from this song summed everything I could do during my first few months of rehab…
And another song to help provide you with guidelines: I Can’t Go For That (No Can Do) – Hall & Oates
After at least six to eight weeks, and with the approval of your orthopod, the permissible actions can include walking, gardening (with safe hip precautions), swimming, and, if you are a klutz on a real bicycle, a stationary bicycle.
“The most wasted of all days is one without laughter.”
E. Cummings
The Ikea Medical Stress Test – Your caregiver duties will vary, but a good attitude (by you) will go a long way to your recovery. If you thought that the three hour assembling of that Ikea product was challenging for your relationship, wait until your caregiver learns how much she/he will need to help you over the next several weeks. Here is a partial list of caregiver duties (so you can warn your spouse):
- Compassionate and patient, and, at least for the first three weeks, very subservient.
- Good observation skills.
- Assistive by helping you to stand, sit, lie down (sounds like a dog training school).
- Providing help with grooming, dressing, feeding and using the bathroom.
- Coordinating the shopping, cleaning, cooking, laundry, picking up prescriptions and other tasks.
- Managing medical appointments and providing transportation.
- Notifying your healthcare team about any changes or concerns (watch out that they don’t change the beneficiary of your will).
- Managing finances and paying regular bills.
- Overseeing insurance paperwork.
Hip Tip – Incentivized Care Giving: My mother-in-law always ignores me when I have a problem which needs her help in getting things done. For example, if I drop mail or a magazine to the floor, she pretends not to see it and just walks right by. What I do to cure that is incentivize her. After I drop a magazine and I can’t get to the floor to pick it up, I drop a dollar bill right next to it. Then, when I hear her coming in, I limp over near the dollar and say, “Can you help me with the magazine? Oh look! There is a dollar too. You can keep the dollar since you saw it first.” After she pounces on the money and wads it tightly into her clenched, veiny fist, she reluctantly picks up my magazine (mumbling something like, “Why do you read this crap?”). Works every time. A side benefit is that I learned not to let so many things fall to the floor.
Getting Out Of Bed – The Leg Hook – I soon learned that if I was lying down on my back, and needed to get to the edge of the bed, I would take my good leg and hook that ankle on the edge of the mattress and then pull myself towards the edge. It still was slow and painstaking.
Stairway To Heaven – Stairs can pose a safety problem even when you are healthy. After surgery, stairs can act like “Russian Roulette” if you don’t pay attention to each movement. Earlier, we discussed the necessity of handrails.
Stair Mastery – Up With The Good, Down With The Bad – Whenever you have an injury to one leg, knee, ankle or hip, your therapist will make you repeat the mantra “up with the good and down with the bad” until you can not only recite it, but it becomes ingrained in your life. You may attempt to navigate the stairway without crutches, but using your crutches, or both sides of handrails, will be your safest bet.
How To Climb Up OR Go Down A Set Of Stairs Using Crutches
How To Use Crutches Going Up A Set Of Stairs
- Hold the handrail with one hand – pretend it is the last beer bottle.
- Put both crutches in your other hand.
- Balance your weight evenly between the handrail and your crutches.
- Step up with your good leg.
- Get your balance before moving farther.
- Bring your crutches and injured leg up so both feet are on the same step.
How To Use Crutches Going Down A Set Of Stairs
- Hold the handrail with one hand.
- Put both crutches in your other hand.
- With your weight on your good leg, move your crutches down one step.
- Step down with your injured leg.
- Support your weight evenly between the handrail and your crutches.
- Slowly bring your good leg down so both feet are on the same step.
Repeat as necessary.
I Was Sleeping On The Couch And Wasn’t Even Mean To My Wife – I have mentioned that a small complication of my surgery was having to urinate frequently, very frequently, even at night. Getting out of bed every two hours was hard and before too long I would fall asleep in bed, but after I got up the first time to pee, I would go to the couch and resume sleeping. The couch was easier because it was smaller and, with post-surgery pain, I wasn’t tossing and turning much anyways.
After Sleeping On Your Back, You Will Want To Sleep On Your Side – At my follow-up, I was told I can sleep on my non-operative side when I become comfortable doing so. The first thing I did was put my good hip down, then placed two pillows on top of my legs, then used my assistive leg loop strap to lift my operated leg onto the pillows. Once I was on my side, as an extra bit of security, I took one more pillow and wedged it between the mattress and my back.
Ultimately, I found that the right angle of the couch seat and couch back provided me that support and was comfortable. I slept mostly on the couch for about three weeks. I have read about others who slept in a recliner or a favorite chair due to post-surgery hip pain.
Hip Tip – Stomach Sleepers: I am a stomach sleeper and it was difficult not to be able to sleep that way. At about the four week mark, I went into the bedroom and laid down across the bed, belly down. I napped for an hour, but when I got up, my hip was really, really sore, not painful, but sore. If you sleep on your stomach, you must be careful getting into this position keeping your safe hip precautions in mind while you turn.

Bandage Management – You will have a sterile bandage on your scar for the first week after total hip replacement surgery. I was given a stack of bandages so they could be changed daily. Some patients continue to wear a bandage to protect their incision from irritation.
Tunes To Relieve Pain – You will experience post-surgical pain. Some people believe by concentrating on something other than your pain, you can decrease the discomfort you feel. Here is a playlist for you by artists who have experienced hip pain and then released an updated version of their previous hit:
- By The Time I Get To Phoenix, I Will Need A New Hip – Glen Campbell
- Get Up, Stand Up, Use Your Walker – Bob Marley & The Wailers
- It’s Too Late, But Not For My New Hip – Carole King
- I Can See For Miles, And Now I Can Walk For Miles Too – The Who
- Hit The Road Jack, For Your Hip Rehab – Ray Charles
- I Will Survive With My New Hip – Gloria Gaynor
- No Longer Killing Me Softly With His Bad Hip – Roberta Flack
- You Make Me Feel Brand New With A Hip Replacement – The Stylistics
- Papa’s Got A Brand New Hip – James Brown
- I Walk The Line, And It’s, Finally, A Straight Line – Johnny Cash
- I Saw Her Standing There With A New Hip – The Beatles
- Help Me Pay For This Hip – Joni Mitchell
- I Feel Really, Really, Really Good – James Brown
- Stand By Your Man, Now That He Has A New Hip – Tammy Wynette
“The true test of a man’s character is what he does when no one is watching.”
UCLA Basketball Coach John Wooden
Have Character – Do It Now – Rehab involves a dedication to working hard because it is the right thing to do. There will be times when you intend to use your walker for 30 minutes, but at the 15 minute mark you are thinking about quitting. Don’t quit. You have to go through all the rehab, and if you don’t do it now, you will have to do it later.

“Dude, get up and exercise! You have been sitting all day.” My laid-back cat, The Goo (who sleeps 20 hours a day), to me on the third day of home rehab. After a brief glance from The Goo, she went back to her sun nap.
Post-Surgery Exercises – Even though I had diligently performed two months of daily prehab exercises, The Goo informed me that I wasn’t up to performing those same exercises right away. I was just too sore. Fortunately, the top prescribed exercise is walking.
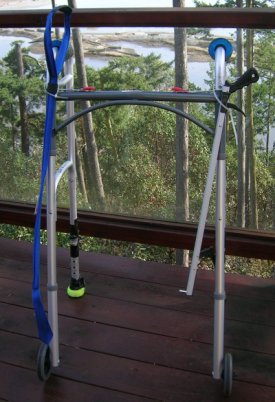
Walk This Way, With Your Walker – A walker will give you the necessary support you keep stable as you start your rehab. There are many types of walkers, and they include some with no wheels, 2 wheels, or 4 wheels. Your therapist will help you choose the type of walker that is best for you, but I started with a no-wheels version so the walker wouldn’t get away from me.
Hmm, just how do I use a walker?
- Push or lift your walker a few inches or up to an arm’s lengths in front of you.
- Make sure all four tips of your walker are sturdy and touching the ground before taking a step.
- Always step forward with your weak leg first.
- Then, step forward with your ‘good’ leg, placing it in front of your repaired leg.
These Walkers Are Made For Everything – You will soon find out that the grabber and the leg lifter strap are probably the two most frequent items you will use. I wanted to keep them near at all times and since I was using my walker at all times I combined the two needs.
I took plastic tie straps and attached them as loops onto my walker. See the photo below. Each front walker leg had a top plastic tie loop. Then I would ‘holster’ my grabber on one side and the leg lifter strap on the other side.
Tearing Up The Walker – After just a few days of using my walker on rough pavement, it was showing. I had gone through the rubberized tips and tennis balls.

Runners And Walkers – When I was running in my 20’s, I would always see someone in front of me and try and pass them. The elite runners weren’t a problem because they were in front me and pulled away, but the average runner was my competitive prey. I would focus on the runner ahead, and just run faster until I passed that person.
When I used my walker in the neighborhood, I was embarrassed that women sipping coffee carrying their babies in front side baby slings were quickly passing by me. I was now so slow that even a ‘walker’ would pass me.
“Walkers! Walkers! They are everywhere! Run!”
Hip Tip – Increase Your Distance Every Day: Use your walker daily and try to increasing your distance each day. I added a half-block or a block each time I walked the neighborhood. After a while, I kept the same distance, but I was doing my walking regimen three times a day. Each individual will vary in their ability to increase their walking distance.
Pre-tied Shoelaces – This is not necessarily safe but I did it. I took my running shoes, loosened them a bit and then tied the shoelaces. This way, I could use the shoehorn to slide my foot into each shoe. With loose fitting shoes you pose a stability risk to yourself and your new hip. Frankly, I mostly wore flip-flops almost everywhere for the first eight weeks.
Take A Stand – My medical staff advised me not to sit longer than 30 to 60 minutes. They said I must get up, walk around and change my position. Besides the need to use walking as rehab, if you don’t stand up, your hip joint can become stiff and you may become more prone to blood clots. The hardest part of this advice, initially, was just to stand up. Keep your walker nearby for extra assistance.
Alrighty… that concludes Chapter 28.